Monday

PDF Tutorial for Making Refillable Journals


Now available:
PDF Tutorial for Making Refillable Journals
Tutorial for the Refillable Journal Binding designed by Elis Cooke

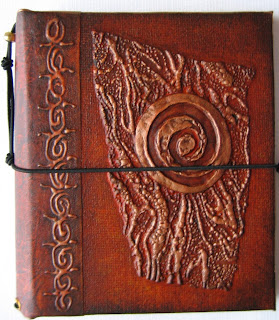
This 56 page step-by-step instruction tutorial, complete with photos and text demonstrates my original binding technique for a refillable journal with 4 folio sections which can hold over 100 pages. The unique binding makes changing, moving and adding pages effortless. This journal is made with 2 sturdy canvas panels as the covers. It has a flexible spine of handmade book cloth so it opens flat for ease of writing or sketching. The elastic which keeps it closed can also be used as a bookmark. These refillable journals make great art journals as you can easily remove your page to work on it with wet media, and then replace it once it dries.

This tutorial is clearly laid out to be suitable for beginners as well as those with craft or book art experience.

The tutorial includes:

Tools and Materials Master List
Instructions for Making Handmade Book Cloth
Instructions for Building the Journal
Instructions for Binding the Refillable Journal
Instructions for Adding or Changing Paper
Table of Measurements for Different Journal Sizes

This tutorial was designed for those who wish to decorate and personalize their journal themselves, therefore this edition DOES NOT INCLUDE HOW TO DECORATE a journal.

Sunday

An Orange Journal

I like orange-- but for some reason it didn't occur to me that a journal could be orange-- so here is my first orange journal-- it makes me think of Orange Crush-- maybe next I will have to try a sunny yellow journal.

Saturday

Textured Journals


8x6 Refillable Journal

6x6 Refillable Journal

Friday

Recent Journals

 4x4 Refillable Journal
with Lunar Phases collage

 9x7 Refillable Journal
with Moon Collage

8x6 Refillable Journal
Handcast Butterfly

Indigo Day

Handmade Journal 6x4 Lunar

Handmade Journal 9x7 Spiral

Saturday

New Journals

6x6 Handmade Journal

9x7 Handmade Journal

Both Journals are refillable and decorated with handpainted papers.

To Refill/ Change or Add Paper

To Refill/ Change or Add paper to the Refillable journals.

1. Cut 7-10 papers to size and fold in half to create a mini folio [booklet].

2.Loosen the large bead at top of the exterior spine which will create slack on the interior elastic.
The Bead loosened from spine.


3. Slide the paper under the elastic until the elastic is resting in the fold. Retighten the spine bead.

Friday

New Journals

4x4 Moon Journal.
I often use my journal covers as a place to experiment. On both of these new journals I was exploring texture [of course] and metallic pigments. The green one has some really cool variations in metallics using blue/green/copper pigments-- it reminds me of varigated metal leaf or foil.

12x9 Mixed Media Journal

Wednesday

Faux Raku Journal

12x9 Handmade Journal

back cover.

If I wasn't a mixed media artist, I would be a potter-- I have a real weakness for pottery-- especially raku-- and I particularly love raku with copper, blue and purple. I am very inspired by pottery glazes and they influence alot of my experiments, especially on my journals. On this one, I was playing with purple, blue and copper using alcohol to create resist areas and mottling. I am really happy with how it turned out. The texture on the front reminds me of those variegated metal foils. Maybe in my next life, I will be a potter... or in this one someone will donate a kiln. :)


Monday

New Journal

9x7 refillable handmade journal
with handcast paper collage and distressed metallic paints.
back cover


Sunday

Using Sections: Time Management

I use my journal for everything-- and I want everything in one place so I don't have to drag around a sketchbook, daytimer, journal, poetry journal, general notebook, lists, art journal etc. All of my journals have separate signatures[sections] of folded paper so I use each section for a specific area. Once I fill that section, I archive it, and refill the section with new paper. My personal favourite journal size is 9x7 because I can use legal size 81/2x14 paper in it. I make up alot of my templates on the computer to work in my journal. I love Excel and make most of my templates using spreadsheets. Over the next while I will try to post pics of some of my templates.
This is a pic of my Week at a Glance template:

It has 8 columns-- one for each day of the week and one for general notes I need to remind myself of for that week. I mostly use my week at a glance for appointment/ committments and to block out time to fit in studio time/ shipping/ computer time and the other things I need to do to try and maintain a balanced life. So my week at glance is more about creating structure for my week. I use post-it notes for my day to day list-- so if I don't get something done one day, I can just move it forward to the next day easily.

Thursday

Print Plates

I like to hand decorate my pages for my journals. These are some of the pages from my journal. I like to write poetry on them, use them as dividers for designating sections or use them as a base for art journaling.

This is a picture of some of my print plates. I use various materials to make them. I use a pencil on styrofoam trays to make an easy negative plate. On matboard, I use dimensional paint, string, dimensional wallpaper, stencils with molding paste or cut up pieces of kids craft foam and adhere them with matte acrylic gel. You can also use linocutters on plumbers rubber gasket. I often use my plates with gesso as it creates a subtle resist pattern when you put a light wash of paint over it.


Wednesday

Background on Making Journals


Fairly regularly I get questions about how my journals work, so I thought I would do a post on it.

I've keep a journal in one form or another for over 20 years. I've used many types [notebooks/binders/spiral bound/hardcover/coptic]-- but none of them were quite what I needed... so eventually I set out to design a journal that would meet all my needs. I use my journal as a sketchbook, art journal, notebook, daytimer & place to write poetry so I wanted one journal to accommodate all these things instead of carrying around 4-5 separate journals, so I determined it needed to have distinct sections. I also wanted it to be refillable because sometimes one section fills up faster than others & I wanted to be able to add new paper to that section or just move pages around if I needed to. My journal goes everywhere with me and spends alot of time banging around in my backpack, so it also needed to be very sturdy.
I use canvas panels for the covers and make my own cotton bookcloth for the spine. After several years of trial and error, I have developed a pulley system for the binding so it can be refilled. It takes about 10 seconds to change the paper, so it is very fast and easy. I include refilling instructions with each journal. You cut the paper to size and fold it in half then slide it into the journal. You can use any kind of paper you like [I use plain paper for most of my sections but like watercolour or printmaking paper for my art journal section] -- depending on the paper thickness-- each section holds 6-10 papers folded which means 12-20 pages per section or 24-40 sides per section. Compact journal sizes from 4x4-up to 4x6 hold 2 sections. 5x7/ 6x6 and 8x6 hold 4 sections. Journal sizes 8x8 up to 12x9 hold 6 sections of paper.


One of the other advantages of my refill system is if you were painting or using wet media, you can slip out the paper you are working on--- paint and let it dry and reinsert it into the journal without having to worry about getting paint/glue or moisture on your other pages. This is another one of the reasons I designed this journal as I tend to be a bit messy when I am art journaling lol!

Oddly enough, the journal I designed for myself has turned out to also be useful to other journal keepers!

Thursday

Dialogue with Time

"Have you also learned that secret for the river; that there is no such thing as time? A bright smile spread over Vasudeva's face. "Yes, Siddhartha. Is this what you mean? That the river is everywhere at the same time, at the source and at the mouth, at the waterfall, at the ferry, at the current, in the ocean and in the mountains, everywhere, and the present only exists for it, not the shadow of the past, not the shadow of the future?" "That is it," said Siddhartha, "and when I learned that I reviewed my life and it was also a river, and Siddhartha the boy, Siddhartha the mature man and Siddhartha the old man were only separated by shadows, not through reality." --From Siddhartha by Herman Hesse.

Access your inner wisdom. Dialogue with your future self, your wise old self, your past--child self, or with the self you will become 5 years from now. What has changed? What has stayed the same? What goals have been achieved? How have you progressed? grown? What are you focused on now? How has your perspective changed? Can your future self provide any insight into things you are dealing with now?

Variations: Again, this is a exploration that can be used again and again. Consider other roles/ parts of the self you could dialogue with? the spirit? soul? inner child? shadow? your critic?

(The concept of Dialoguing has been adapted from Ira Progoff At a Journal Workshop.)